How To Do Pull Ups – The Complete Guide
How To Do Pull Ups – The Complete Guide
Of all the exercises there are, the one that most people struggle with more than the others is the pull up. In this article I’m going to teach you how to do pull ups, no matter where you are starting from.
It’s going to be a bit of a read, but it won’t leave a single stone unturned when it comes to teaching you how to do pull ups. Over the years I’ve had so many questions about how to do pull ups that I’ve decided to put it all into one long blog post! If you or anyone you know are struggling with pull ups, send them this article.
How To Do Pull Ups Part 1: Pull Up Muscles Worked and Anatomy
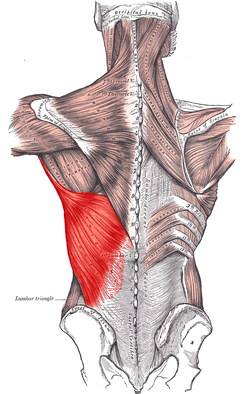
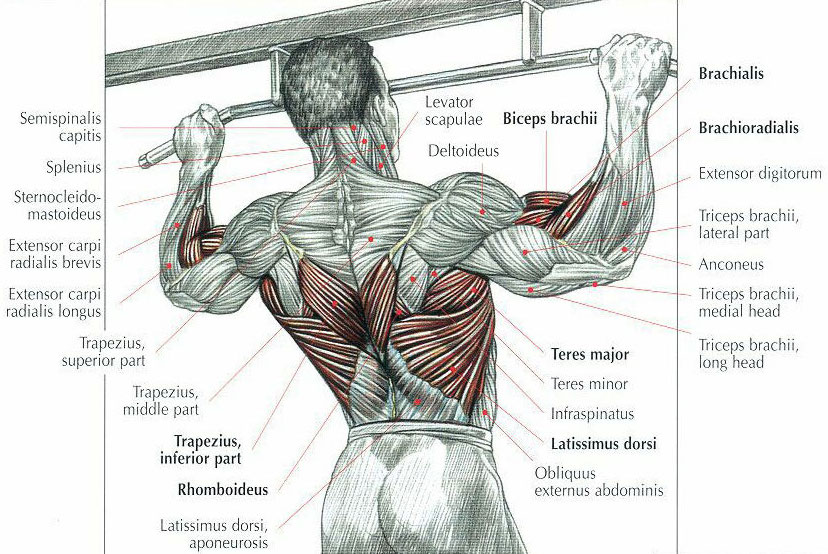
A lot of people assume that pull ups are an arm exercise. Where there’s an element of truth in this, the main muscles responsible for the movement (when it is done correctly) are the latissimus dorsi – the large muscles either side of the spine…
The muscles of the rear deltoid (back of the shoulder) and the biceps (front of the arm) also help with the movement, but the main muscles used are in the back. To some degree almost all of the upper body muscles are used in the pull up, which is what makes it such an effective exercise.
The image below gives you a better idea of the muscles used….
Now we have established exactly what muscles the pull up trains, we have to look in more detail at exactly how we can go about improving our ability to do a pull up.
How to Do Pull Ups Part 2: Weight Loss
Here’s a simple fact. The heavier something is, the harder it is to pick up.
With this in mind, let’s look at weight loss. Of course we are going to be working on increasing our strength, but if you are overweight and struggling to do pull ups, improve your chances of managing pull ups by dropping some weight.
Even losing as little as 10lbs can be the difference between succeeding and failing.
Once you get to a point of doing multiple reps, the weight loss effect is even greater. If you’re 20lbs over weight, each rep is 20lbs harder than it should be. This means that if you manage 5 reps, you’ve lifted 100lbs of extra weight.
A lot.
Excess weight really hinders your ability to do pull ups, so for more help on losing weight, start here.
How To Do Pull Ups Part 3: The Pull Up Technique
The pull up is less a movement of pulling directly up – instead think of the movement as one where you pull your torso to the bar.
I like to get personal training clients to focus on pulling their chest up and at the same time, pulling their elbows BACK and DOWN. Check out the video below – watch it a couple of times. You’re looking for…
- The position of the back and chest – notice there’s a slight arch. I’m pulling my chest towards the bar. This makes the back muscles do more of the work instead of the weaker arm muscles.
- See the path of the elbows – I’m pulling them both BACK and DOWN, not just down. Again, this makes the back do more work.
There’s a reason for this – by focussing on the chest up, elbows back and down movement pattern, you force the body into the correct position, where the back is concave and the movement leads with the chest, not the head. Learning this technique early will really help you to do pull ups.
This body position ensures you use the lats do the work and not the arms. It helps with muscle recruitment and makes sure you move efficiently. This is key to doing pull ups – if you rely on your arm strength you’ll limit your pull ups because those muscles are smaller, meaning they’ll tire quicker.
Practice this body position first, to make sure that you can ‘feel’ the movement and how the position effects the target muscles.
How to Do Pull Ups Part 4: Accessory Exercises for Pull Ups
We have to strengthen the target muscles that are used as part of the pull up. There are exercises that are really effective at this and have a lower barrier to entry than pull ups.
You should be doing these alongside any pull up training you are doing. Strengthening the muscles you are going to use in the exercise is never a bad thing!
Here are the accessory exercises I use for pull ups and why…
Pull Up Accessory Exercise: Snatch Grip Deadlifts
Deadlifts are the king of exercises in a lot of people’s opinion and it’s pretty hard to argue with the claim. In this case, they strengthen the legs, back and core but also (and this is way more important than people realise), the grip. A good grip is essential to doing pull ups successfully.
I like to use the snatch grip deadlift to help with pull ups – there’s two reasons for this…
- The grip is double overhand, just like pull ups. In a normal deadlift I use an alternating grip, so it doesn’t translate to pull ups very effectively.
- The hand position is wide, which is similar to pull ups.
Pull Up Accessory Exercise: Band Assisted Pull Ups
A lot of exercise is down to technique – the more effective and efficient your technique is, the easier an exercise is to perform. In this video I have a picture of a personal training client at the start of her pull up journey.
We are using bands here – purely to practice the movement for the exercise. There will be some strength improvement from this, but the main focus of the pull up accessory exercise in this case is practice of technique.
With the band assisted pull ups you can scale the exercises up and down by changing the resistance of the bands (a thicker, tighter band makes the pull up easier) and the number of bands. In this video, we have Hannah using two bands, but when she mastered this we dropped it to one band, then eventually no bands.
The benefit of the band assisted pull ups is that they allow you to ‘feel’ the movement pattern and practice the sequence. It’s a way to go through the movement whilst still limiting fatigue.
Pull Up Accessory Exercise: TRX Rows
The TRX row is a good accessory exercise because the barrier to entry is low – you don’t need a huge amount of strength with it to begin with, so it’s really helpful for total beginners.
You can make the exercise tougher by making the body position more horizontal – in the video I’m keeping it fairly neutral for demonstration purposes, but you can make the exercise easier or harder very quickly with a subtle change in body position.
At the top of the exercise, squeeze the shoulder blades together to really activate the musculature of the upper back.
Pull Up Accessory Exercise: Lat Pulldowns
The lat pulldown is an exercise more associated with bodybuilding than as an accessory exercise to pull ups, but the movement pattern is perfect for replicating the movement of the pull up itself.
With multiple adjustment positions for grip adjustment and dozens of weight adjustments available, it’s an exercise that can be made suitable for all kinds of levels of ability.
To focus on the exercise being a useful pull up accessory exercise, try to replicate the movement pattern shown in the first video showing you how to do pull ups – focus on bring the bar to the chest, rather than pulling straight down. Retract the shoulder blades and pull the elbows back and down.
Pull Up Accessory Exercise: Chin Ups
Once you have reached a point where you are strong enough to pull your body weight up to a bar, you can start with chin ups – these are pull ups with an underhand grip.
Thanks to a mechanical advantage of recruiting the biceps, chins ups are an easier exercise to perform than pull ups. They also target very similar muscles and are an excellent confidence builder for anyone who is working their way towards a pull up.
There is a real sense of achievement when you manage your first pull up, so it’s certainly an exercise that should feature in any pull up programme!
Improving your pull ups
Once you have managed to perform a full pull up, you can seek to improve them with a few specific variations. There are two in particular that I like to use both in my own training and with personal training clients….
1. Negatives
Negatives are when you perform a very slow eccentric phase of the movement. In the case of pull ups, you pull up as fast as you normally would, but you lower yourself as slow as possible – aiming for at least five seconds to return to the start position.
You’ll increase the time under tension of the muscles, increasing the amount of work they do. This has the effect of increasing strength and muscle size.
2. Weighted Pull/Chin Ups
I like to include weighted pull ups and chin ups – even better if they can be done as part of a superset as shown in the exercise video below.
This is a much more advanced strategy to employ, but one that is worth it. Pushing yourself to do pull up and chin ups under fatigue creates a huge barrier and means that when you come to do them when fresh, you’ll have more in the tank and be able to perform more pull ups.
3. Grip strength
A final point to work on is your grip – it’s attachment of you to the bar after all. I work on grip with farmers walks and heavy deadlifts, both of which seem to work well.
The big improvement on grip strength comes from lifting heavy weights rather than from longer sets. The improvement on grip strength endurance comes from medium/heavy weight sets with multiple reps.
Pull Ups vs Chin Ups
This feels like a natural point in the article to talk about pull ups vs chin ups. I’ve spoken about chin ups being used as accessory exercise to pull ups and I’m aware that this makes chins ups sound like an inferior exercise to pull ups.
This isn’t the case – they’re just different exercises. They share a movement pattern and a target similar muscles, but chin ups recruit the biceps more effectively than pull ups and are perhaps a more efficient exercise. This allows most people to perform more reps, building the back muscles more effectively.
Pull ups are more difficult to do for more people, suggesting they are better for building strength but not quite as effective for building muscle.
The pull up recruits the teres major and posterior deltoid more effectively than the chin up so has additional rehab benefits over the chin up.
There is a space for both the pull up and the chin up in a training programme though, so it’s not a question of either/both – it’s a case of how to use both for maximum health, fitness and performance benefits.
Tips for Improving Your Pull Ups
As with anything, practice is key to perfection. You have to keep using the muscles, practicing the movements and perfecting the muscle recruitment pattern.
The way I like to do this is with a home pull up bar, it allows me to keep on top of my pull ups. It’s also handy for days when I’m sat at my desk working on my online fitness programme, the ABC Programme – sitting down can be detrimental for back health, so a few pull ups throughout the day help my back out a lot!
Some people refer to this regular practice as ‘greasing the groove’, where practicing with even a few reps per day just keeps the relevant muscles strong and the motor patterns fixed in the brain – either way, it’s a very effective way to improve your pull ups.
Equipment To Help You Improve Your Pull Ups
The most important piece of equipment is the obvious one – a sturdy pull up bar. I’d advise you to steer clear of the pull up bars that you wedge between the sides of a door frame, unless you want to end up on YouTube with people laughing at you…
I use this one and it hasn’t failed me yet. I also weigh 95kg so it’s certainly been load-tested!
If you require something a little more steady, you could do a lot worse than pick up this wall-mounted pull up bar. It’s largely up to you – I only use the one I do because I can remove it from the door frame. If I had a home gym, I’d certainly drill one into the wall for the extra stability.
Pull Up Bands
Another extremely valuable kit when learning how to do pull ups are the bands. They come in all kinds of different thicknesses and resistances, meaning they are scalable and helpful regardless of where you are starting from.
I like these ones from bodytek.
Most of the main brands do a decent pull up band – the ones below are absolutely fine and more than adequate for most people who are learning how to do pull ups.
These bands can also be used for all kinds of different exercises including warm ups, push ups, glute activation exercises and a whole load of rehab and activation work. They certainly aren’t just used for pull ups! Your money won’t be wasted if you buy them.
I also like these
Pull Ups in Training Programmes
Once you’ve learned how to do pull ups, you can include them in training programmes, giving you significant extra variety. You can also pair them with other exercises, taking the pull up from a strength/muscle building exercise to a conditioning exercise.
Here are a couple of examples I use in both my own training and with my personal training clients. They’re really effective!
How to do Pull Ups: Conclusion
I hope having read the how to do pull ups guide you’ve learnt a thing or two about the kind of exercises you need to do in order to get there. I also hope you understand the biomechanics and the anatomy a little better too.
Here’s the step by step guide on how to do pull ups…
Step 1: Start by improving your chances – if you need to lose weight to help you, do so.
Step 2: From there you can build up the strength of the relevant muscles, working on assisted versions of the pull up.
Step 3: Once you have built enough strength to master the control of your own body weight for a couple of reps, start to train with chin ups.
Step 4: At the point you can perform multiple chin ups, try a pull up.
Step 5: When you can do pull ups, improve them by using negatives, weighted versions and supersets.
Step 6: When you can do pull ups relatively easily, combine them with other exercises to add variety to your training.
That, in a 2500 word nutshell, is how you do pull ups! I hope you’ve enjoyed the article, learnt a few things and have been inspired to learn to do pull ups yourself!
By the way, if you subscribe to the Hoyles Fitness mailing list you’ll receive a free eBook containing 101 Health and Fitness Tips, plus offers and news exclusive to Hoyles Fitness subscribers. Click the image below to download…


One thought on “How To Do Pull Ups – The Complete Guide”